In this tutorial, you’ll learn how to use Jira Automation to build a review cycle into your Jira Cloud workflows, so that you can implement a compliant review process without the overhead of third-party apps and electronic signatures. You’ll find this feature helpful for bug triage, design reviews, and anywhere else an audit-ready review process required.
Configuration Steps
Note: These instructions are written for company-managed projects. Currently, team-managed projects do not support the read-only text fields used in these configurations.
Custom User Groups
Create a custom user group for each reviewer role that will be added to your review cycle. (For example: ‘business-reviewers‘ and ‘technical-reviewers‘.) The groups will be used to drive notifications and restrict transitions.
- Go to Settings –> User Management –> Groups
- Select Create Group.
- Configure the new group:
- Group name: Give the group a descriptive name
- (Optional) Group members: Populate the group with an initial list of members
- (Optional) Group description: Create a useful description. Indicate the group is used to assign review permissions to users.
- Repeat Steps 2 and 3 for each role that will be added to your review cycle.
Custom Fields
Create custom fields to capture the reviewer and timestamp details for each review task.
- Go to Settings –> Issues –> Custom fields.
- Select Create custom field.
- Select Advanced –> Text Field (read only).
- Press Next.
- This field will contain name and user ID of the person completing the approval. So give the field a name that indicates the meaning of the electronic approval you are implementing. For example: Business Reviewer, Technical Reviewer, QA Reviewer, etc.
- (Optional) Provide a field description.
- Press Create.
- Select the issue types screens where this field should be displayed.
- Press Update.
- Repeat Steps 2 through 9 to create a corresponding timestamp field. Give the field a name that corresponds with the name given to the first field. For example: Business Reviewed, Business Reviewed On, etc.
- Repeat the above steps for each additional review role that will be added to your review cycle. When you are finished, you should have two (2) fields for each review task.
Create a Comments Screen
- Go to Settings –> Issues –> Screens.
- Select Add screen.
- Name the screen: Prompt for Comments Screen
- (Optional) Provide a screen description.
- Press Add.
Note: No further configuration is necessary. This screen will not contain any fields; it will only contain the default Add Comments section provided by Jira.

FREE TRAINING
Build a GxP Workflow in Jira Cloud
Learn how to build a simple Jira Cloud workflow suitable for pharmaceuticals, medical devices, healthcare, finance, and other highly regulated industries.
- ✅Electronic signatures compatible with 21 CFR Part 11 to streamline your approval process into a single workflow.
- ✅Field validation to verify user data as the workflow progresses
- ✅User permissions to configure which team members can move electronic records through different steps of the workflow
- ✅Status-based workflow controls to protect the integrity of records that have been reviewed or approved.
Workflow Configurations
Open Workflow for Editing
- Go to Settings –> Issues –> Workflows.
- Select to edit the workflow where you want to add the review cycle.
Add Statuses & Transitions
- In Diagram view, insert a Pending Review status. (Select to create a new status as needed.)
- After the Pending Review status, insert a status for each review task. For example: “Business Reviewed’ and “Technical Reviewed”. (Select to create new statuses as needed.)
- Create the following transitions. Tailor the list of transitions to match the names and number of review tasks in your review cycle:
- Submit for review: [Prior status] –> Pending Review
- Complete business review: Pending Review –> Business Reviewed
- Screen: Prompt for Comments Screen
- Complete technical review: Pending Review –> Technical Reviewed
- Screen: Prompt for Comments Screen
- Cancel review: Pending Review –> [Prior status]
- Continue review cycle:
- Business Reviewed –> Pending Review
- Technical Reviewed –> Pending Review
- Complete review cycle:
- Business Reviewed –> [Post-review status]
- Technical Reviewed –> [Post-review status]
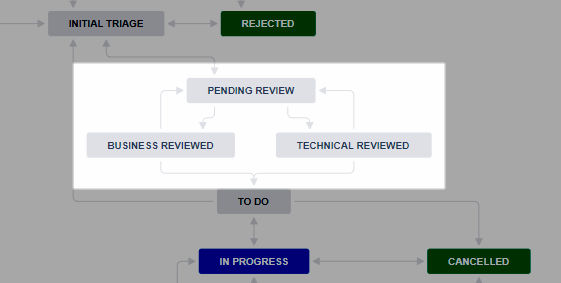
This is an example of a completed workflow. Note that in this example “Initial Triage” is the prior status, and “To Do” is the post-review status. The names of your statuses will likely differ.
Configure Transition Conditions
- Select to view the properties of the first transition from Pending Review to a review task status. (For example: Pending Review –> Business Reviewed)
- Select Conditions.
- Select Add condition.
- Select User is in group. Press Add.
- Select the user group that corresponds with the current review task. (For example: business-reviewers)
- Press Add.
- Repeat Steps 1 through 6 for each of the remaining review task transitions. (For example: Pending Review –> Technical Reviewed)
- Select to view the properties of the first transition from Pending Review to the post-review status. (For example: Pending Review –> To Do)
- Select Conditions.
- Select Add condition.
- Select Hide from user condition.
- Press Add.
- Repeat Steps 8 through 12 for each of the remaining transitions out of Business Reviewed, Technical Reviewed, etc.
- When you are finished, only users in each reviewer group will be able to transition from Pending Review to reviewed, and only Jira Automation will be able to transition from reviewed back to Pending Review or forward to the post-review status.
Configuring Jira Automation
- Navigate to your project.
- Go to Project Settings –> Automation.
(Note: If you have Jira Premium, you can go to Settings –> System –> Global Automation.)
Configure Rule — Notify Reviewers
- Select Create rule.
- Under New Trigger, select Issue transitioned.
- Configure the From status and To status to match the transition from the pre-review status into Pending Review
- Press Save.
- Select to add a New action.
- Under New Action, select Send email.
- Configure the email:
- To: Select the first review group that should be notified.
- Subject: Configure a meaningful subject. Consider using Jira Smart Values. For example:
Bug {{issue.key}} is pending technical review - Content: Configure helpful content. Consider using Jira Smart Values, especially issue.url for embedding a hyperlink to the issue in Jira. For example:
The following bug is ready for technical review:{{issue.key}}: {{issue.summary}}{{issue.description}}{{issue.url}}
- Press Save.
- Repeat Steps 5 through 8 for each email notification that should be sent. (Typically, one per reviewer group.)
- Provide a name for your new automation. For example, “Notify Reviewers“.
- Press Turn in on.
- Select Return to list.
Here’s an example of a completed notifications rule:

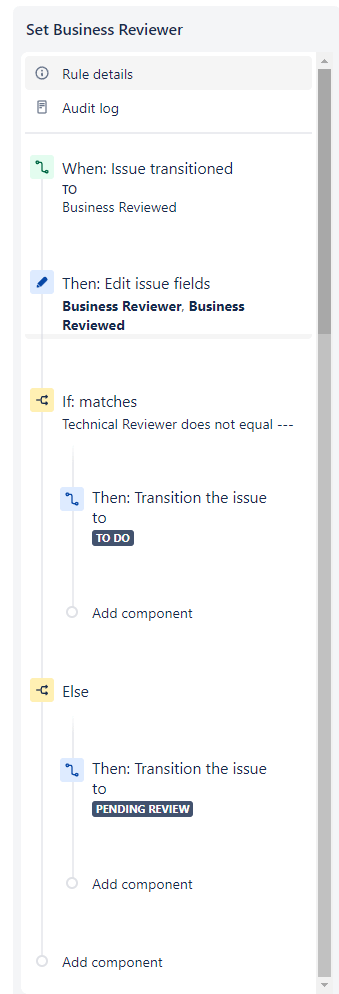
Configure Rules — Set Reviewers
- Select Create rule.
- Under New Trigger, select Issue transitioned.
- Configure the From status to be blank and the To status to one of your reviewed status (ex: Business Reviewed).
- Press Save.
- Select to add a New action.
- Under New Action, select Edit issue.
- Select to edit the two review info fields associated with the current status (example: Business Reviewer and Business Reviewed).
- For the user name and ID field (ex: Business Reviewer), enter the following value (learn more):
{{initiator.displayName}} (ID: {{initiator.emailAddress}}) - For the timestamp field (ex: Business Reviewed), enter the following value (learn more):
{{now.longDateTime}} - Press Save.
- Select to add a New condition.
- Under New condition, select lf / else block.
- Configure the If block:
- Run actions if: All conditions match
- Conditions:
- Issue fields condition
- Field: Technical Review (for example)
- Condition: does not equal
- Value: —
- Add additional field conditions for any other reviewer fields (if you have more than two reviewers in your review cycle).
- Issue fields condition
- Press Save.
- Select to add a New action to the If block.
- Select the Transition issue action.
- Select the post-review status (ex: To Do) as the Destination status.
- Press Save.
- Select to add a New action to the else block.
- Select the Transition issue action.
- Select Pending Review as the Destination status.
- Press Save.
- Provide a name for your new automation. For example, “Set Business Reviewers“.
- Press Turn in on.
- Select Return to list.
- Repeat Steps 1 through 24 for each review task in your review cycle.
Here’s an example of a completed notifications rule:
Configure Rule – Clear Reviewers
- Select Create rule.
- Under New Trigger, select Issue transitioned.
- Configure the From status to be blank and the To status to match pre-review status (for example: Initial Triage).
- Press Save.
- Select to add a New action.
- Under New Action, select Edit issue.
- Select to edit all the reviewer fields by setting them to: —
- Example:
- Business Review: —
- Business Reviewed: —
- Technical Review: —
- Technical Reviewed: —
- Note: Due to a limitation of Jira, you cannot clear these fields with an empty string or null value. You must specify a non-zero-length string, or the automation will fail to update the field.
- Example:
- Press Save.
- Provide a name for your new automation. For example, “Clear Reviewer Fields“.
- Press Turn in on.
Here is an example of a completed rule:
Your First GxP Workflow in Jira Cloud
Learn how to build a simple Jira Cloud workflow suitable for pharmaceuticals, medical devices, healthcare, finance, and other highly regulated industries.
- ✅Electronic signatures compatible with 21 CFR Part 11 to streamline your approval process into a single workflow.
- ✅Field validation to verify user data as the workflow progresses
- ✅User permissions to configure which team members can move electronic records through different steps of the workflow
- ✅Status-based workflow controls to protect the integrity of records that have been reviewed or approved.
Related Tutorials
More Information
Find more strategies like this in my Quick Start Guide for Jira Cloud: https://www.agile-innovations.tech/part-11
For more information about Jira automation, checkout Atlassian’s documentation: